#OSINT Workflow Wednesday 
Another week, another workflow. This week we’re going to look at YouTube and how to deconstruct videos, analyze the outputs, and apply automation and AI-lite to the results at scale.
Let’s go!
(1/10)

Another week, another workflow. This week we’re going to look at YouTube and how to deconstruct videos, analyze the outputs, and apply automation and AI-lite to the results at scale.
Let’s go!
(1/10)
Step 1: Select a Video of Interest
Go to YouTube and find any video. Don’t pick anything too long for this workflow because it’ll be difficult to work with. Keep it under 15 minutes or 200 mb if you can. Great use cases are wartime videos, human rights violations, etc.
(2/10)
Go to YouTube and find any video. Don’t pick anything too long for this workflow because it’ll be difficult to work with. Keep it under 15 minutes or 200 mb if you can. Great use cases are wartime videos, human rights violations, etc.
(2/10)
Step 2: Download the Video
You can inspect the element and extract the video, use a Python script, or use a web app. I’ll recommend a quick web app called YT1s that allows you to put in a YouTube link and download the video.
https://yt1s.com/
(3/10)
You can inspect the element and extract the video, use a Python script, or use a web app. I’ll recommend a quick web app called YT1s that allows you to put in a YouTube link and download the video.
https://yt1s.com/
(3/10)
Step 3: Split the Video into Images
You can upload the new video to an online tool called Video to JPG from Online Converter. It supports videos up to 200 mb. I like it because it downloads the results as a zip to your local drive.
https://www.onlineconverter.com/video-to-jpg
(4/10)
You can upload the new video to an online tool called Video to JPG from Online Converter. It supports videos up to 200 mb. I like it because it downloads the results as a zip to your local drive.
https://www.onlineconverter.com/video-to-jpg
(4/10)
Step 4: Analyze the Images for People
Once you’ve split your video into images from individual frames, now it’s time to analyze the results. You’re looking for specific persons of interest within the images of the video. Crop their face to remove any noise.
(5/10)
Once you’ve split your video into images from individual frames, now it’s time to analyze the results. You’re looking for specific persons of interest within the images of the video. Crop their face to remove any noise.
(5/10)
Step 5: Isolate the Face
To increase the likelihood of success, you want to remove the background from the images leaving only the person’s face. Use a tool like http://remove.bg to pull this off in record time!
(6/10)
To increase the likelihood of success, you want to remove the background from the images leaving only the person’s face. Use a tool like http://remove.bg to pull this off in record time!
(6/10)
Step 6: Analyze the Images for Landmarks
Let’s move into landmarks. Crop out any landmarks or unique identifiers within each image to sort through later. Remove the background for the landmarks unless the background is important. Blur any obstructions.
(7/10)
Let’s move into landmarks. Crop out any landmarks or unique identifiers within each image to sort through later. Remove the background for the landmarks unless the background is important. Blur any obstructions.
(7/10)
Step 7: Reverse Image Search
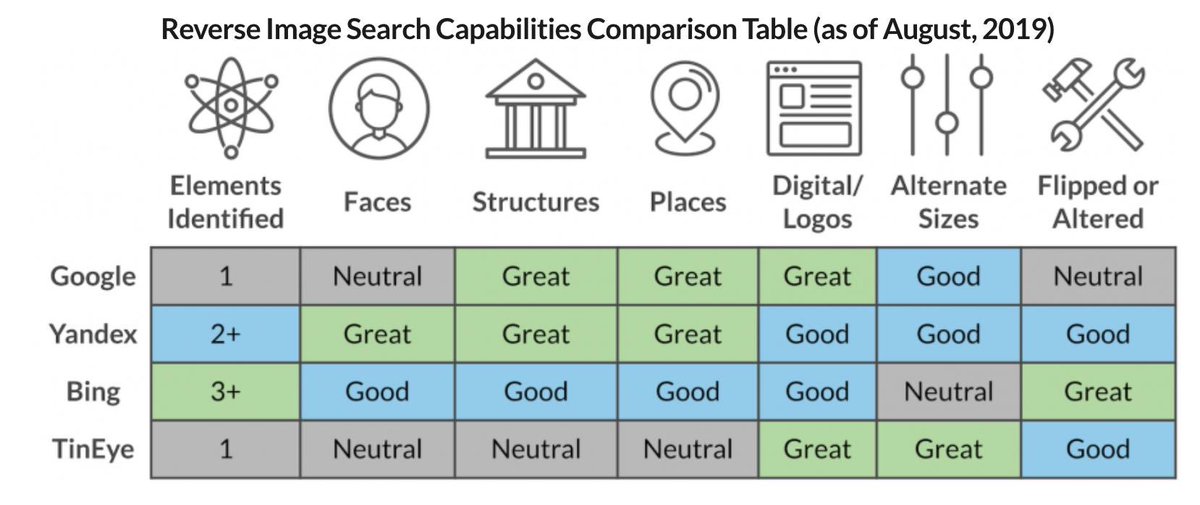
With the new cropped and edited images, let’s start reverse image searching. Use every reverse search you can (see image). Use this infographic for reference. This works better for landmarks than people but you might get lucky.
(8/10)
With the new cropped and edited images, let’s start reverse image searching. Use every reverse search you can (see image). Use this infographic for reference. This works better for landmarks than people but you might get lucky.
(8/10)
Step 8: Facial Recognition
We can use an open source tool called face_recognition to create a library of people you're looking for and run the new faces against those to see if there’s a match.
https://github.com/ageitgey/face_recognition
(9/10)
We can use an open source tool called face_recognition to create a library of people you're looking for and run the new faces against those to see if there’s a match.
https://github.com/ageitgey/face_recognition
(9/10)
Step 9: Share your Findings
#OSINT is beginning to be adopted by a ton of industries with a variety of use cases. If you have an interesting case study using this workflow, share it with everyone!
Thanks for reading!
(10/10)
#OSINT is beginning to be adopted by a ton of industries with a variety of use cases. If you have an interesting case study using this workflow, share it with everyone!
Thanks for reading!
(10/10)

 Read on Twitter


