I have not felt like journaling my trades for a while but recently started it again. It's not fun in any way, but it does allow you to take a step back and think before hitting any buttons. Besides entry and exits, I keep 3 additional stats: R, MAE, and MFE.
EXPLAINER TIME!
EXPLAINER TIME!
First, a glossary of these terms:
 R = Abstracted unit of measurement for the amount of risk (absolute value of entry price-stop price).
 MAE = Min. price reached during your trade before exiting (or your stop if stopped out).
 MFE = Max. price reached during your trade.
 R = Abstracted unit of measurement for the amount of risk (absolute value of entry price-stop price).
 MAE = Min. price reached during your trade before exiting (or your stop if stopped out).
 MFE = Max. price reached during your trade.
Quick sample:
- Enter coin at 400 sats.
- Stop at 380 sats.
- 1R = 20 sats.
- Exit at 460 sats = realized a 3R trade.
- Min. price during the trade is 390 = MAE R is -0.5R.
- Max. price during the trade was 500 = MFE R is 5R.
Simple, so far.
- Enter coin at 400 sats.
- Stop at 380 sats.
- 1R = 20 sats.
- Exit at 460 sats = realized a 3R trade.
- Min. price during the trade is 390 = MAE R is -0.5R.
- Max. price during the trade was 500 = MFE R is 5R.
Simple, so far.
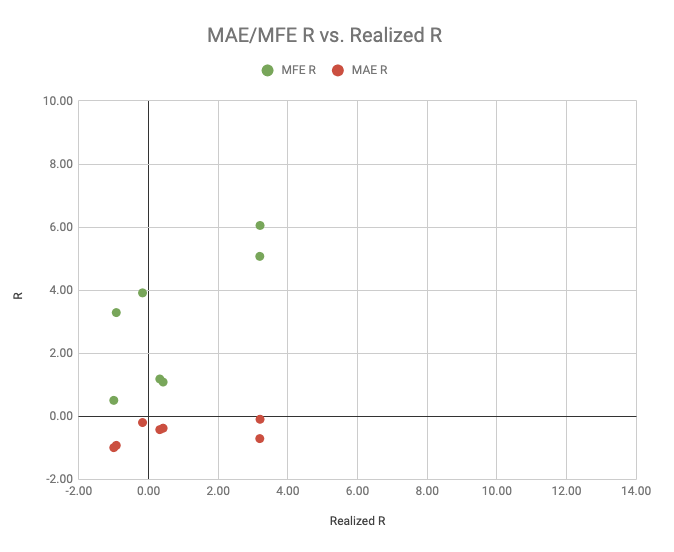
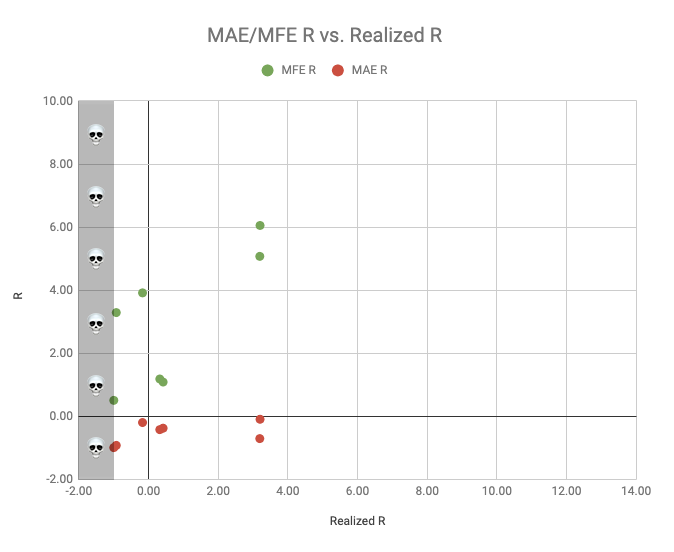
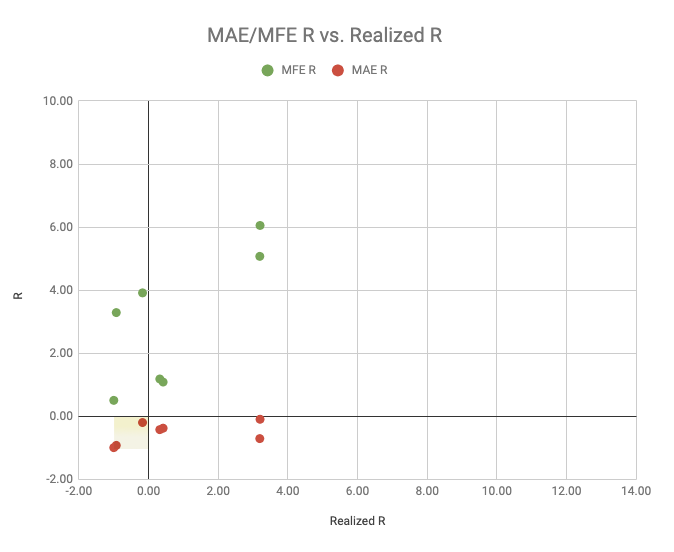
So, if we keep track of these 3 values for all of our trades we can compare them because we're using an abstracted unit. Let's plot these 3 in a chart with Realized R on the X-axis and MFER and MAER on Y-axis. That could look something like this (sample data for illustration)...
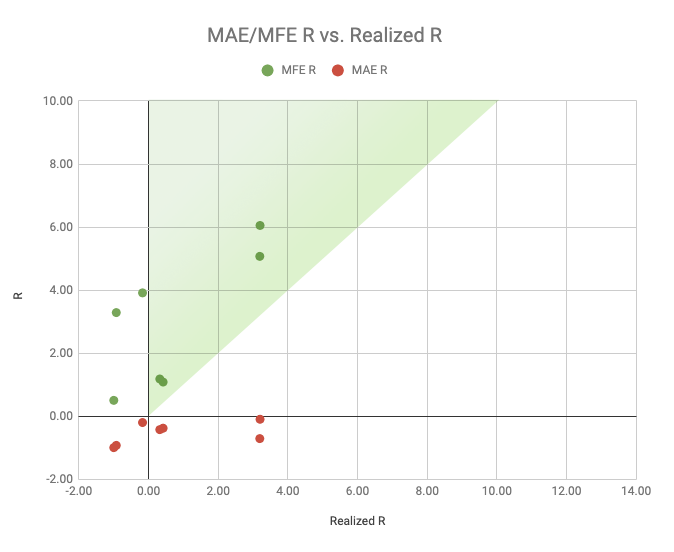
Let's start analyzing some parts of it. First, draw a diagonal through the positive area of the chart.
If you have MFER (green) values that fall below this line you're doing something wrong. You can't have realized more profit than the high of the coin has reached.
If you have MFER (green) values that fall below this line you're doing something wrong. You can't have realized more profit than the high of the coin has reached.
The closer to this diagonal the better, because it means that your realized profit (Realized R) and the maximum possible profit (MFE R) are really close to one another. The further to the right on the X-axis, the better, because it simply means you've made more profit.
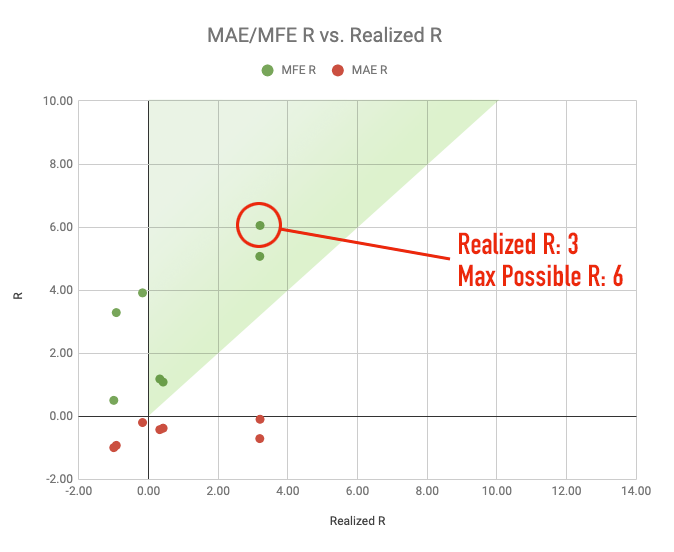
If you have a lot of points further away from the line it means that you left a lot of profit on the table. E.g. the trade that's shown below. You could've had twice as much profit but for some reason, you left it on the table.
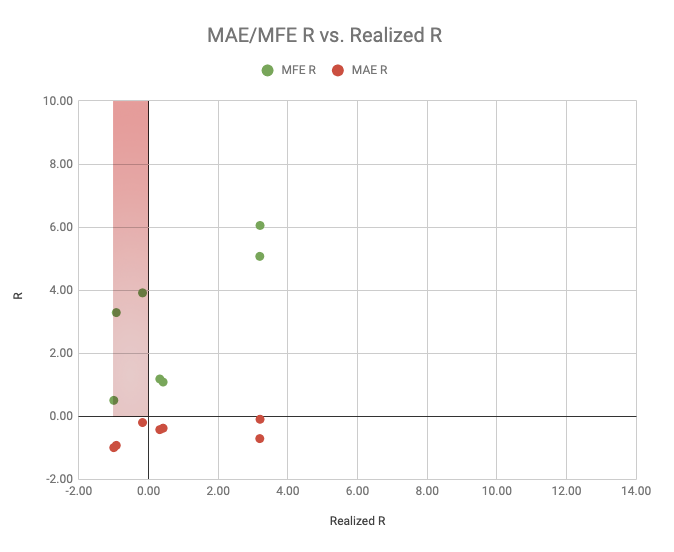
Moving on to another area on the chart. Here we have the "Area of Horrible Decisions" (marked in red). The higher we go in this area the worse it gets. These are the trades that were closed at a loss but had reached a profitable high. Imagine closing a 6R trade at a -1R loss 

Samples of trades like this?
1. Not securing profits in time and $BTC ruining the party stopping you out at a loss.
2. A scam pump to make a high, followed by a dump to stop you out.
You probably get the idea. Either way, you're leaving a lot of profit on the table.
1. Not securing profits in time and $BTC ruining the party stopping you out at a loss.
2. A scam pump to make a high, followed by a dump to stop you out.
You probably get the idea. Either way, you're leaving a lot of profit on the table.
Then comes an area where we don't want to see anything. AKA The Kill Zone. This is the area beyond -1R. What does it mean? It means that your trade was closed somewhere below your initial stop loss. NEVER change your initial stop loss. Have a plan before entering and stick to it.
One more little area of note, the area between the origin point and -1R/-1R (yellow). These are trades that we, unfortunately, didn't close profitably, but at least stopped out within our pre-defined risk. If applying position sizing, this should not phase you.
And that's it. The area with red dots in the positive part of the X-axis doesn't really matter. They're trades that we closed profitably but never dipped below our original entry. So what do we have here? A fairly simple graph that can tell a lot about your performance!
Summarizing:
 A lot of trades far away from the diagonal in the green area? You know how to pick winners, but structurally don't take enough profit. Try experimenting with moving your stops sooner to lock in more.
 A lot of trades far away from the diagonal in the green area? You know how to pick winners, but structurally don't take enough profit. Try experimenting with moving your stops sooner to lock in more.
 A lot of trades in the red area? Probably quite a few trades where you could have had a nice profit, but for some reason, you took a loss. Closing trades too late?
 If you have a lot of items in here, perhaps trading is not for you.
So. What's stopping you from journaling at least these few basics? It will greatly improve your trading if you know where your actual problem areas are. Clear off that desk and get going. Would love to see your graphs if you decide to create them 


 Read on Twitter